Lesson 5 Vibe Coding
You have written your first working GAML models, debugged reflexes and builds agents that actually move. At some point in this process you probably wondered: Can I use a GenAI tool to help me with this? The answer is yes and in this lesson we will learn how. In 2025 Andrej Karpathy, former co-founder and researcher at OpenAI and AI-Lead at Tesla mentioned the term “Vibe Coding” for the first time (Karpathy 2025). But with all new tools, knowing when and how to use them matters more than the tool itself.
By the end of this lesson, you will be able to do:
- Explain what Vibe Coding is, how it changes the coding workflow and which tools can be used for spatial simulation
- Write effective prompts that produce useful, high-level and well documented code output
- Critically verify and evaluate AI-generated code before integrating it into your models
Vibe Coding should be used as an extension of your own thinking not as a replacement.
5.1 Introduction into Vibe Coding
5.1.1 What is Vibe Coding?
The way software is developed has changed dramatically since the rise of Large Language Models (LLMs). One emerging paradigm is “Vibe Coding”, a term coined by Andrej Karpathy in early 2025. It describes the process of producing executable code by prompting AI tools in natural language rather then producing the code manually by hand. Karpathy characterized the approach as one where the developer fully trusts the AI’s output, accepts all changes and barely reads the produced code (Karpathy 2025). Horvat describes it more broadly as the process of producing executable code without understanding it (Horvat 2025).
The advantages are clearly visible: It accelerates the development of working prototypes and makes programming more accessible, especially for non-programmers. However, it also comes with its downsides. Code generated by LLMs often contains bugs, security vulnerabilities and is difficult to maintain, since neither the developer nor the AI fully understands the codebase in a traditional sense (Harkar 2026).
It is therefore understood as a powerful support tool. Particularly suited for rapid prototyping and small projects, rather than a replacement for professional software development. Karpathy himself put plainly: “It’s not too bad for throwaway weekend projects, but still quite amusing. I’m building a project or webapp, but it’s not really coding - I just see stuff, say stuff, run stuff, and copy paste stuff, and it mostly works.” (Karpathy 2025) To get the most out of it, users need to understand code before using Vibe Coding and adapt their workflow accordingly.
5.1.2 What is changing throughout the coding workflow with Vibe Coding?
The traditional software developers write their code line by line in a methodical manner. They have knowledge about the whole codebase and handle errors by manually debugging it. The codebase they have written is characterized by high quality and maintainability. In the age of Vibe Coding this workflow is changing fundamentally. It can be roughly divided in the following separate steps (Google Cloud 2026):
- Description of Objectives: You describe the desired functionality of what the AI should generate in plain natural language, for example: “Generate a cow agent, that is wandering around in GAMA”
- Code Generation: The Prompt is processed by AI, which produces a code output
- Execution and Verification: The generated output is executed and its behavior is observed
- Feedback: If output does not match the desired functionality, describe the misbehavior and provide new instructions to the AI
- Repeat: This cycle of prompting, generating, testing and refining repeats until the project objectives are met.
So you see there is a change of the role of the developer itself. Rather than writing and understanding the code line by line, the developer acts more like a director, defining objectives, evaluating outcomes and guiding the AI tools through successive iterations (Sapkota et al. 2025). However this shift comes with responsibility. That’s why in this course understanding the code always comes first.
5.1.3 Model Design before Coding
Before you start coding: sit down and try to draw a UML. What is the exact purpose of your model? What should happen in the initialisation? Which agents? Which attributes will agents need? What will be the behaviour of your agents? Will there be a cellular automaton? Which spatial resolution do cells have? Which attributes? Which temporal resolution will be one time step? What are state variables that report the state of your modelled system over time? What are user-defined parameters? Once you have defined the model specifications, start to implement the model’s structure. Only then start to populate the code with attributes and behaviour.
5.1.4 Our Approach: AI-Assisted Programming
Pure Vibe Coding, where the developer is fully and blindly trusting the AI generated output, is not the goal of this course.
Instead, this course follows the principle of AI-Assisted programming: a responsible approach in which the AI acts as a pair programmer which generated code is always reviewed, tested and understood (Google Cloud 2026).
The goal is therefore to create awareness of both possibilities and the limitations of AI tools. You will first learn what the code does and why, you will write, read, debug and test it. This way you remain in control of the code but benefit from the AI tools as much as possible.
5.1.5 Which tools can I use to vibe code?
Vibe coding tools come in five forms, ranging from simple browser-based chats to fully autonomous agents. They differ mainly in how much access the AI has to your files and how much control you retain. The sections below walk through each option with its strengths, limitations, and implications for version control.
Web
The web-based chat interface is the most widely known entry point for vibe coding. You describe your problem directly in the browser, paste in relevant code snippets, and review the generated output manually. There is no direct connection to your file system, which keeps the setup simple but requires manual copy-pasting between the chat and your editor. Version control is entirely your own responsibility.
Alongside the established American providers, a growing number of European companies now offer competitive language models suitable for AI-assisted development.
Integrated Development Environment (IDE)
The IDE integration embeds the AI assistant directly into your coding editor. It provides autocomplete, inline edits, and a chat panel with full access to your project context without ever leaving your development environment. This makes it the most fluid option for iterative vibe coding, as suggestions appear where the code lives. Most IDE integrations are Git-aware and respect your existing version control workflow, meaning changes can be reviewed, staged, and committed as usual. This makes it straightforward to track what the AI changed and roll back if needed.
Command Line Interface (CLI)
The CLI is one of the most powerful yet underestimated options, and for many users the most unfamiliar. A CLI agent runs directly in your terminal, reads and writes files without copy-pasting, and can navigate your entire project structure. It combines naturally with build tools, test runners, and shell scripts, enabling fully automated workflows. The tradeoff is that you are granting the AI broad access to your system, which demands a higher level of trust and caution. CLI tools are generally Git-aware and can commit changes directly, which makes version control straightforward, but also means it is important to review diffs carefully before committing, as the agent may modify multiple files at once.
Notebooks
Notebooks combine Markdown, code, and visualizations in a single document built
around executable cells. AI integration in notebooks works similarly to IDE
integrations, the assistant has access to the project context and can suggest or
generate cell content inline. This mode is particularly well-suited for
data-driven and iterative exploration, where outputs are inspected and refined
step by step. Version control in notebooks is a known challenge: the .ipynb
format stores cell outputs alongside code, which produces large and hard-to-read
diffs in Git.
Agents
Agents represent the most autonomous form of vibe coding. You provide a high-level goal and the agent handles the rest like planning steps, executing them, and self-correcting along the way. There is no need for continuous human input during the process. Because agents can make wide-ranging changes across many files in a single run, version control is essential: always work in a clean Git branch before running an agent, so that the full set of changes can be inspected and reverted if necessary. Due to this autonomy and the associated risk of unintended changes, agents are not recommended for this course, but are mentioned here for completeness.
5.1.6 What to use for Spatial Simulation
Before reading on, take a moment to think about the following questions:
1. GAML is a niche language with little publicly available code - how does that affect which tool you choose?
Most of the tools described above work well for mainstream programming languages like Python or JavaScript, which are well-represented in the training data of every major AI model. Spatial simulation with GAMA is a different situation. GAML is a niche language with a small community and limited publicly available code, which means AI models have seen comparatively little of it during training. The result is that no tool will produce reliable GAML out of the box.
The good news is that this can be compensated. GAML is syntactically close to Java and Python, and the underlying concepts are well understood by current models. The gap is not conceptual but contextual: the AI simply needs more guidance than usual. Providing your own.gaml
files or relevant sections of the GAMA documentation directly in the conversation
makes a substantial difference in output quality, regardless of which tool you use.
2. Which of the five modes do you think works best for writing GAML code?
With that in mind, there are four practical workflows for combining AI assistance with GAMA:
Web with context - Use for example Claude in the browser for
architecture decisions, model design, and debugging. Paste your .gaml file
alongside your question to give the AI the context it needs. Run and visualize
the simulation in the GAMA IDE as usual. This requires the least setup and is the
most straightforward starting point.
CLI alongside the GAMA IDE - Write and edit .gaml files using a CLI agent
such as Claude Code directly in your terminal. The agent reads and modifies your
project files without copy-pasting. Switch to the GAMA IDE to run and visualize
the simulation. Both tools work on the same files, so the only overhead is a
window switch.
.gaml files with full project context and inline suggestions.
As with the CLI approach, the GAMA IDE remains the tool for running and visualizing
the simulation. Cursor in particular works well here, as it can reference all your
.gaml files at once.
3. Are there any modes that seem less useful for GAMA, and why?
Notebooks are only marginally useful for GAMA: they can help with post-processing simulation outputs in Python, but have no role in the simulation itself. Agents are best avoided for now, because they are not inline with the objectives of this lesson.Additional Thougths
After reading about all the different tools out there and which one is the best to use for Spatial Simulation, to spend some additional thought on other topics like hallucination or execution of well written prompts. Especially for niche languages like GAML, we want to minimize hallucinations as much as possible. In our experience, there are large differences between products, e.g. ChatGPT hallucinates a lot more than comparable products. Furthermore if we want to change just a snippet of code, e.g. a reflex, sometimes models also change other parts of the code, which makes debugging a nightmare. In contrast to ChatGPT, Claude is for example very consistent with the changes and refactors only that code snippet you asked for. As the tools develop very rapidly, it is worth to compare different tools if possible and elaborate, which tools serve your purpose best.
5.1.7 Versioning with AI
Developing code is an incremental process: you add a functional detail to the model -> you test, whether the model does, what it should. If you find a bug, you need to debug until you are sure that the improved model works as it should. If you are really sure the model with the added functionality works, make it a new version.
I recommend to develop your model code in explicit versions, especially, when you develop your model with genAI support. With genAI support, you are usually quicker, but that also means that even if you try to stay focused and keep the lead of the design process, in my experience, this speed makes it easier to overlook conceptual deviations from what you intend to implement. In such cases it’s very valuable to be able to revisit prior versions.
Further, I recommend to use a proper git versioning tool to keep track of your versions. You can use git, the free and open-source version control system on your computer. Git comes with a GUI, but there are also a lot of other GUI clients for git. If you want to host and share your project online, you can use e.g. GitHub.
Large functional changes justify a new version (e.g. v1.5 to v2.0), otherwise it’s just a minor version increment (e.g. v1.1 to v1.2).
If you develop your model with a genAI tool, let your AI-tool know when a code is a new (minor) version. It will help you to summarise the major changes. Review the indicated changes: does this summarise your intentions of the change? Edit the change log with your own words, and then copy it into your git documentation. The genAI will learn from your approach and after a while, start to suggest when to declare a new version.
5.2 Prompt Engineering
Imagine you ask a colleague: “Can you finish the report?” They know what you mean. They have been in the same meetings, know the deadline, the audience, and what “finished” looks like. They fill in the gaps with shared context you never had to spell out.
Now imagine you send that exact message to a language model.
What do you think the model will do?
It will produce a report. Confidently. Immediately. Without asking a single question. But which report? How long? For whom? In what format? Based on which data?
The model is not being careless - it simply has no shared history with you, no implicit understanding of your project, and no habit of asking for clarification before diving in. It filled in every gap you left open, just not the way you intended.
How would you rewrite the prompt to fix this?
A more explicit version might look like this:
Write a two-page summary report of the traffic simulation results from last week.
The audience is urban planners with no programming background. Use plain language,
include one table comparing the three scenarios, and end with three concrete
recommendations.
Same request, but now the model has context, a defined audience, a format, and a clear goal. The output will be fundamentally different.
This is the core idea behind prompt engineering. It is less about speaking
differently and more about thinking carefully about what you are actually asking for. It means being explicit about context, intent, format, and constraints in ways that
everyday conversation rarely requires.
5.2.1 Anatomy of a Prompt
A prompt can be broken down into 5 building blocks. Together they give the model everything it needs to produce reliable output.
- Role: Who should the model act as? (“You are an expert in agent-based modelling…”)
- Context: What is the background? What should your model know about the project?
- Task: What exactly should the model do?
- Format: How should the ouput look like? Code, markdown, step-by-step instructions, a table?
- Constraints: What should it avoid or stay within? (“Only use built-in GAMA operators”)
Not every prompt needs all five but the more unfamiliar the task, the more building blocks you will need.
5.2.2 Basic techniques of Prompting
The following techniques form the foundation of effective prompting. A good rule of thumb: start simple and add more guidance only when the output is not what you expected.
Zero-shot: You provide no examples. The model completes the task based solely on its training. This works well for common or straightforward requests. (“Write a GAMA species that moves randomly.”)
One-shot: You provide exactly one example for the model to orientate itself. Useful when you have a specific style or structure in mind. (“Here is an example of how I write a species. Write a new one in the same style.”)
Few-shot: You provide multiple examples. The more examples you give, the better the model understands the pattern you expect. This is particularly valuable for GAMA, where you can show the model your own code style and project conventions before asking it to generate something new. (“Here are three species from my model. Write a fourth one that follows the same pattern.”)
Chain-of-thought: You ask the model to explain its reasoning explicitly before producing an answer. This noticeably improves quality for complex tasks, as the model works through the problem rather than jumping straight to a response. (“Think through the problem step by step before writing the code.”)
Iterative prompting: A prompt is rarely perfect on the first attempt. Rather than starting over, build on the previous response: correct what was wrong, ask for refinements, or add constraints you forgot to include. Treat the conversation as a dialogue, not a single instruction.
5.2.3 Context Engineering
Whether context engineering is a subtopic of prompt engineering or a discipline of its own is still debated. For this lesson we treat it as an important step that comes before writing the actual prompt — the preparation that makes the prompt work. This matters especially for GAML. Because it is a niche language with limited training data in most models, the quality of the AI response depends heavily on what you bring to the conversation. A well-constructed context is often the difference between a code snippet that runs and one that invents operators that do not exist. Before writing your next GAMA prompt, work through the following checklist:
- Model Identity: The LLM must understand what will be simulated, not technically, semantically
This is a pedestrian evacuation model in a urban grid environment.
Agents represent citizens trying to reach exit points.- Already existing Code: Provide the relevant
.gamlfiles or just the relevant section. Do not only describe the mistake, provide also the code that produced the error.
- GAML - Version & Constraints: GAMA is evolving over time, and features that exist in older versions are now deprecated or replaced by new ones.
- Provide Project Structure: What exists already? Which dependencies between them exist? You can also provide a file-tree with descriptions.
My model has three species: Pedestrian, Exit, Obstacle.
Pedestrian uses a graph built from the road network.- Error Message & Expectations: Error will occure, but if you want help from AI, you need to provide error, the expected behavior and the code snippet that produced the error.
Error: "Cannot find action move_to for species Pedestrian"
Expected: The pedestrian should move towards the nearest exit each step.
Code: [.gaml snippet]- Documentation: For niche languages like GAML it is very beneficial to load the whole documentation as a context, so it can rely on the right information and reduce hallucination.
Cost of Context: Only include what is directly relevant to your question. More context not always better, it can distract the model, and depending on the tool you use, increase costs.
5.2.4 Language for GAMA
For the production of reliable code, there are a few keywords in GAMA that need to be known by you and the model. The following list encompass some of the most important keywords:
| Operator | Description |
|---|---|
| species | defines the agent types |
| reflex | Behavior that is executed every simulation step per default |
| action | named, callable behavior (similar like functions) |
| do | calls an action |
| ask | asks other agents to perform an action |
| global | the global environment that runs once |
| init | initialization block, that executes once at the start |
For further readings and the complete list of keywords and important attributes, please consider the official GAMA documentation.
5.2.5 Common Mistakes
In this section, we look at the most common mistakes made when working with LLMs. Now it is your turn to apply your knowledge you have learned so far. You will be presented with a prompt and asked to identify the mistakes and correct them.
Mistake #1
What will go wrong?
This prompt gives the model no direction. It will produce something — perhaps adding a new behaviour, changing colours, or restructuring the code — but almost certainly not what you had in mind. “Better” means something different to everyone, and the model will simply guess.How could you improve the prompt?
Please improve the wandering behaviour of my cow model. The cow should only be
able to turn up to 75 degrees relative to its current walking direction per step,
so that it moves in smoother, more realistic paths rather than turning around
immediately.
Mistake #2
What will go wrong?
The model has no idea what your species looks like, how it is defined, or what you are trying to achieve. It will guess a fix — likely suggesting a generic solution that either uses operators that do not exist in your GAMA version, or contradicts the structure of your existing code. You will spend more time correcting the response than if you had written the fix yourself.How could you improve the prompt?
I am using GAMA 1.9.3. My Pedestrian species should move towards the nearest
Exit agent each simulation step. Here is my current species definition:

[paste your .gaml species block here]

I get the following error: "Cannot find action 'goto' for species Pedestrian."
What is causing this and how do I fix it?Mistake #3
Create a complete GAMA model with a road network, pedestrian agents that avoid
obstacles, a dynamic traffic system, real-time weather effects on movement speed,
and a dashboard showing live statistics.
What will go wrong?
The model will attempt to fulfil every requirement at once — and deliver something that technically compiles but is riddled with errors, missing connections between species, and invented operators. The more tasks you pack into a single prompt, the less reliably each one is handled. You will end up with a large block of broken code that is hard to debug because you do not know which part went wrong first.How could you improve the prompt?
Break the request into separate, focused prompts — one task at a time:
Step 1:
Step 2 — once Step 1 works:
Here is my current Pedestrian species: [paste code]
Add the ability for the pedestrian to detect and avoid Obstacle agents within
a radius of 5 meters.
Step 3 — and so on.
Each step builds on verified, working code. This way errors stay small and traceable, and the AI has full context of what already works before adding something new.5.2.6 Optional: Further Readings
If you want to dive deeper into prompt engineering or other topics regarding LLMs, it can be beneficial to visit the website of the companies that are providing the models, respectively. Most of them offer good documentation about the usage of their services and how to get the most out of their models. For example Anthropic has a dedicated section for Prompt Engineering included in their documentation.
5.3 Verification of AI-generated Code
AI assistants can generate plausible-looking code quickly, but plausible is not the same as correct. A model that compiles and runs is not necessarily a model that does what you intended. Verification is the practice of systematically checking AI-generated code before trusting its output.
Effective verification requires three things that no AI tool can replace:
Domain knowledge: you can only verify what you understand. If you do not know how wildfire spreads physically, you will not notice when the model gets it wrong. Verification requires the ability to form an expectation and compare it against what you observe.
Knowledge of your tools and language: hallucinated operators are only suspicious if you know what actually exists in the language, or at least know where to look. The same applies to file formats, coordinate systems, and API conventions.
Critical distance: the greatest risk in vibe coding is accepting output that looks plausible. Verification requires an active stance: assume errors exist until you have proven otherwise.
5.3.1 Why AI Errors are Different
We tend to think that AI makes mistakes where tasks get complex. In practice, AI makes a different kind of mistake to those humans would make: errors tend to appear exactly where everything looks straightforward. This is a consequence of how language models work. Rather than understanding code semantically and logically, they predict the most statistically likely next token based on patterns seen during the training process. Code that looks plausible gets generated confidently, regardless of whether it is logically correct.
This means verification cannot rely on intuition alone. Errors made by AI do not follow the same patterns as human mistakes, they appear where code looks most plausible, where humans tend to think the code must be correct and not necessarily where it is the most complex (Tambon et al. 2024). You will encounter this in the work with AI-assisted programming and the exercise at the end of this chapter is designed with exactly this in mind.
5.3.2 GAMA Debugging Toolkit
Debugging is the procedure to identify and eliminate errors and flaws in your code. It is an integral part of programming. As you develop a new part of your code, you will immediately test and debug it. A systematically tested and debugged code is verified: a verified code does, what it is expected to do.
- Testing is an integral part of programming
- Test, while you write
- Test, before you use the model
For effective debugging, you systematically look into the five different kinds of errors. GAMA supports this task, as it continuously compiles the code that you enter and immediately reports on errors. However, the compiler only finds syntactic and semantic errors. Runtime errors happen during simulation runs and cause the simulation to stop with an error report.
Reference documents
This is a collection of resources to support your model programming tasks throughout this course. Especially the statement documentation will be your permanent companion for coding.
The GAMA website http://gama-platform.org
- basic skeleton of a GAMA model model organisation
- step-by-step tutorials of how to build a model: GAMA Tutorials
- the documentation of all statements collection of statements
GitHub Wiki: https://github.com/gama-platform/gama/wiki
- Errors in your model? Code Verification helps: Debugging
Syntax (and semantic) errors
Syntactic errors indicate that a piece of code does not conform to the syntax of the programming language. Semantic errors are similar to syntactic errors; they use a correct syntax, but the syntax does not make sense. The most common error sources are:
- Missing or incorrect brackets,
- use of statements that do not exist (often just a misspelling), or
- only one input is given, if GAMA expects two.
Syntactic and semantic errors are shown with red markers at the erroneous code line. If you hover over the red marker, more information about the error will be displayed. This information can be useful, but sometimes it is not pointing directly to the source of the error. Try to implement the two following statements. Can you spot the error? Which error message do you get?
reflexi myProcess { }
if grid_value > 150.0 []
Warnings
If the model can be compiled, although there is a flaw in the code, you will get a warning. Probably, you have encountered the according yellow ‘warning’ markers before. Often these are caused, when parsing an incorrect data type to a variable. For example, if you declare an integer variable and parse a float value:
int myVariable <- 10.0;Warnings can be ignored - at least in the draft versions of your code. The code will work despite the warning. It is good practice to avoid them, but this is nothing to spend your nights on.
Runtime errors
Runtime errors cannot be found by the compiler beforehand, they appear during a simulation run. Thus, no red markers appear in the code. A typical example would be a division by a variable that at some point in the simulation takes the value of zero. Runtime errors stop the simulation run immediately and display and error message in the experiment view of GAMA. To learn about where in the code the error originated, you can open the drop down context of the error message.
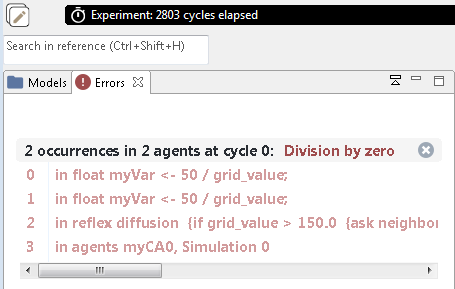
Figure 5.1: Run-time error message in GAMA that tells you that you tried to divide by zero.
This error is common with random number generators: rnd (10) returns a random value between 0 and 9 (not between 1 and 10 as you may expect). For how long do you expect a model with the following code to run?
int myRandomVariable <- rnd(10);
float myResult <- 100 / myRandomVariable;
Misunderstanding of statements
Domain-specific computer languages like GAMA are written for domain experts. They try to use statements that are as simple and intuitive as possible. However, unlike in human language we still have to deal with a computer language. This means, that no fuzziness or inaccuracy is possible.
For example, you want to find all agents that are at the distance of 20 units from you and type in the following.
myAgents at_distance 20;What GAMA returns is not the set of agents at the distance = 20, but instead all agents that are exactly at within the distance of 20.
To avoid such misunderstandings, carefully check the statement in the GAMA documentation: http://gama-platform.org/. Use the search field at the top right to find the command you are interested in. This website is always open alongside to GAMA, when I code a model.
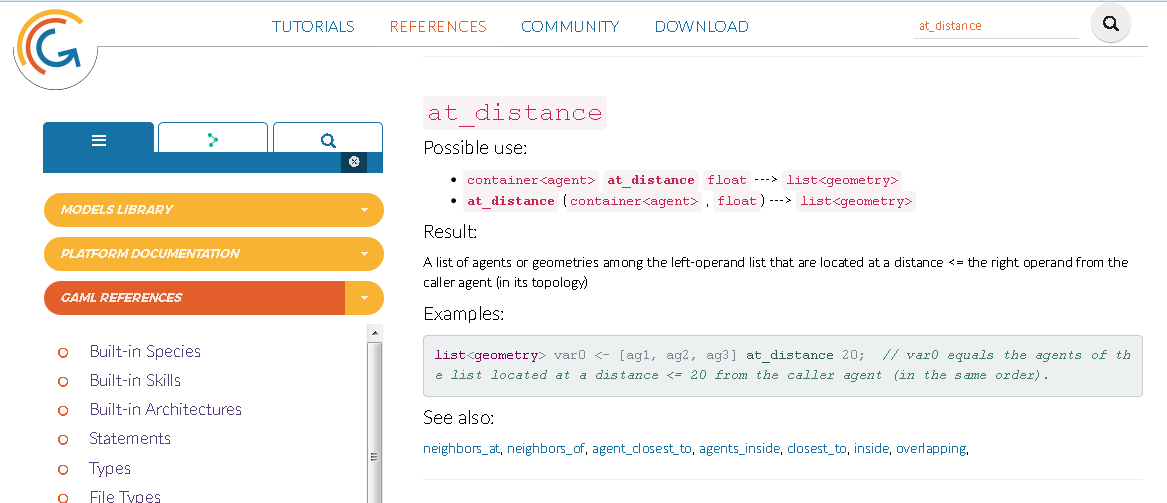
Figure 5.2: The GAMA documentation is indispensable to understand, what a command does.
Logical errors
Logical errors are the most tricky ones. A logical error is, when the program logic does not match your conceptual model. These are difficult to find, and sometimes you do not even realise that they are there! So, to have a fully verified model, you have to test all model parts and the model as a whole for plausibility for common cases, but also extreme parameter settings.
In case your model produces non-plausible results, this is what you can do:
- use common sense
Narrow down the problem: What is strange about your model? What happens? When do the strange things happen? Which code part can be responsible for the behaviour? Think like a compiler, go through the model line by line and try to understand what exactly is computed during one simulation step.
- Toggle comments
To effectively narrow down an error, you may want to delete a part of the code that you suspect to cause the problem. However, you would loose a lot of work. So it is better to just tell the computer, that it should ignore it. So, you want to comment it out. Remember: this is done with the double-slash at the beginning of the code line //. To do this for an entire code block, select the code and use the shortcut CTRL and 7 to toggle the code on and off.
Of course you can do this only, if these are not essential parts of a model. However, for example a where clause of an if statement can easily be commented out. The same can be true for a reflex statement block.
Report the state of the model to the console
Reporting the model state is actually good practice in programming. Write the current value of a variable to the console. This slows down the model, but performance is not important in the testing phase. It’s quite common that I have 5 or 10 write statements distributed in my code, while I am testing.
The following statement will write the location and the corresponding value of all cells to the console. Try it out and check the result in the Console!
write "Grid value of " + grid_x + " " + grid_y + ": " + grid_value;Hint: use write statements within if blocks to test, whether and when it is executed.
Visualise the state of the model to a map or chart
For an explorative testing phase, visualisation can be more effective than writing values of variables.
- Make use of the map output to visualise the state of agents and cells. Use different shapes for different types of agents, use size to visualise values, shade the cells, according to the grid_value. Change colours, in case of a certain action or if statement is executed.
- Make use of the inspect functionality in the map output: right mouse click on the cell or agent you want to explore in more detail -> inspect. The agent will be highlighted and all attribute values displayed.
- Make use of monitors and the chart output to see the state and trend of variables. All these visualisations are explorative and part of testing. They are not included in the final code, but are indispensable for verification.
Use the interactive console
There are two types of consoles in GAMA: the ‘regular’ console and the ‘interactive console’. The first reports whatever your model writes to the console. The latter allows you to interact with the current state of your model in a simulation.
If you want to experiment with the interactive console, open the toy model “Life.gaml” and check the code: the cellular automaton in this model is called “life_cell” and it has a variable called new_state. Now, start the experiment and type into the interactive console:
ask life_cell {write new_state;}Switch to the regular console and check the results. Now go one simulation step forward, switch back to the interactive console (delete everything with the crossed out A) and type in again the above statement. Check the results.
What happens, if you type in the following?
ask life_cell {color <- #green;}The interactive console is extremely valuable, when you want to test whether a piece of code acts like you want, or when you want to interactively explore the state of your model.
You are now well-equipped to identify and eliminate errors. Good luck!
5.3.3 A framework for verification
Regardless of the programming language, simulation platform, or domain, AI-generated code can fail at four distinct levels. Working through them in order is more efficient than searching randomly.
Level 1 — Syntax and compilation Does the code run at all? The development environment will tell you immediately. Errors at this level are the easiest to find but not always the easiest to fix, particularly when the cause is a hallucinated function that looks legitimate. The key question: does every operator or function actually exist in this language?
Level 2 — Data and environment Does the model load the right data correctly? Many environments fail silently when a file is missing or misnamed, no error message, just empty output. The key question: does the model produce the expected number of agents, rows, or features after loading?
Level 3 — Spatial and technical correctness Do the technical relationships hold coordinate systems, units, geometric operations, data types? These errors require looking beyond the code itself and checking the underlying data and configuration. The key question: do the outputs align with a known reference?
Level 4 — Logic and domain correctness Does the model behave as the domain would predict? The code compiles, the data loads, the geometry looks right but the simulation does something physically or conceptually wrong. These are the hardest errors to find because no tool will flag them. The key question: does the output match what I would expect from a simple, controlled test case?
This framework applies to any AI-generated simulation code whether written in GAML, Python, R, or NetLogo. The specific tools change, but the four levels remain the same. In the exercise below, each level is illustrated with a concrete error from an AI-generated GAMA model.
5.3.4 Exercise — Wildfire Salzachauen
The following exercise applies these four levels to a concrete example. You receive an AI-generated wildfire simulation for the Salzachauen a Natura 2000 protected forest area near Salzburg. The model was produced using the prompt from the previous chapter. Your task is to find and fix all errors by working through each verification level systematically.
Download the zip file for this exercise here and place the files as follows in your GAMA project:
Vibe_Coding_Verification_Task/
├── models/
│   └── Wildfire_Salzachauen_errors.gaml   ← AI-generated model with errors
├── includes/
│   ├── salzachauen_forest.shp
│   ├── ...
│   └── salzachauen_water.shp
└── solutions/                            ← solution files for every level
    ├── Wildfire_Salzachauen_level1.gaml
    ├── ...
    └── Wildfire_Salzachauen_final.gaml
Place the model file in your GAMA project models/ folder and the shapefiles
in includes/.
Level 1 — Syntax and compilation errors
Load Wildfire_Salzachauen_errors.gaml in GAMA. Do not read the code first —
load it directly and observe what happens.
What error messages does GAMA throw? Can you identify which line causes the error?
Hint
Look at the error message carefully. It will point to a specific line. If an operator name looks unfamiliar, search for it in the GAMA documentation.
Error and fix
Wildfire spread is a common simulation use case, which means language models
have seen many examples of it but not necessarily in GAML. As a result, the
model invented a built-in action spread_fire() that does not exist in GAMA.
This is a typical hallucination: the operator name sounds plausible and fits
the context, but GAMA will throw a compilation error the moment you try to run
the model. Always verify unfamiliar operators against the
GAMA documentation before running.
The spread logic needs to be implemented manually. Before looking at the solution, try to sketch an approach yourself using the hints below.
Hints
- The spread reflex should only trigger when the cell state is
"burning" - Each burning cell has a timer. When it reaches zero the cell turns
"burnt"and stops spreading - Burning cells can only ignite neighbours that are unburned forest cells, water cells act as firebreaks and must be excluded
- For each candidate neighbour, calculate the angle from the current cell
towards the neighbour using
towards - Compute the angular difference between that angle and the wind direction, mirror differences above 180° so the result is always between 0° and 180°
- Adjust the ignition probability based on the angular difference: increase it if the neighbour is within the wind cone, decrease it if it lies against the wind
- Draw a random number, if it falls below the adjusted probability, ignite the neighbour and update its state, timer, and colour
Code
reflex spread when: state = "burning" {

    burn_timer <- burn_timer - 1;
    if (burn_timer <= 0) {
        state <- "burnt";
        color <- rgb(60, 60, 60);
    }

    ask neighbors where (each.state = "unburned"
        and each.cell_type = "forest") {

        float angle_to_neighbour <- myself.location towards self.location;
        float angle_diff <- abs(angle_to_neighbour - wind_direction) mod 360.0;
        if (angle_diff > 180) { angle_diff <- 360 - angle_diff; }

        float prob <- base_probability;
        if (angle_diff <= wind_cone) {
            prob <- prob - wind_bonus * wind_speed;
        } else if (angle_diff >= (180 - wind_cone)) {
            prob <- max(0.0, prob + wind_penalty * wind_speed);
        }

        if (rnd(1.0) < prob) {
            state      <- "burning";
            burn_timer <- burn_duration;
            color      <- rgb(255, 80, 0);
        }
    }
}
Fix with AI
Once you have identified the hallucinated operator, you can ask an AI assistant to help you implement the correct spread logic. A well-structured prompt for this error would look like this:
I am using GAMA 2025-06. I have a grid-based wildfire model where each
FireCell should spread fire to its neighbouring forest cells. The AI-generated
code used spread_fire() which does not exist in GAML.

Here is the relevant species definition: [paste FireCell species]

Please implement the spread reflex manually. It should:
- Only trigger when the cell state is "burning"
- Count down a burn timer and turn the cell "burnt" when it reaches zero
- Spread to unburned forest neighbours within a 4-cell neighbourhood
- Adjust ignition probability based on wind direction and a wind cone angle
- Only use built-in GAML operators
Level 2 — Data and path errors
Fix the compilation error from Level 1 so the model loads. Run the simulation and observe what happens.
Does the simulation produce the expected output?
Hint
GAMA does not always throw an error when a file cannot be found it may simply create zero agents and continue running silently. This makes data and path errors harder to spot than compilation errors. Checking the monitors for agent counts immediately after starting the simulation is a good habit to build whenever you load a new model.
Error and fix
The file paths in the model point to .gpkg files, but the files in
your includes/ folder are Shapefiles (.shp). GAMA loads nothing and
creates no agents — without throwing an error message.
The fix is to correct the file extension in both paths:
file forest_file <- file("../includes/salzachauen_forest.shp");
file water_file  <- file("../includes/salzachauen_water.shp");
This is also a prompt engineering lesson: always specify the exact file format and extension in your prompt. The more specific you are about file formats, the less room there is for the model to guess incorrectly.
Fix with AI
Data and path errors are easy to fix once identified but the prompt matters to prevent them from appearing in future generations:
I am using GAMA 2025-06. My model loads two Shapefiles (.shp) from the
includes/ folder of my GAMA project. The correct paths are:

forest_file: "../includes/salzachauen_forest.shp"
water_file: "../includes/salzachauen_water.shp"

The AI previously used .gpkg instead of .shp. Please correct the file
paths and confirm no other path references exist in the model.
Note that this type of error is best prevented at the prompting stage specifying the exact file format and path structure in your initial context removes any ambiguity.
Level 3 — Spatial errors
The fire now spreads correctly. Watch it carefully near the water bodies.
Does the fire stop at the water or does it cross it?
Hint
There are two separate spatial errors here. One is in the cell
classification logic in the code — look at the order in which cell types
are assigned in the init block. The other is in the geodata itself,
check the CRS of your shapefiles in QGIS under Layer Properties → Information.
Errors and fixes
Error A — Water priority inverted
In the init block, the cell classification checks for forest before
checking for water:
if (forest_union != nil and shape intersects forest_union) {
    cell_type <- "forest";
} else if (water_union != nil and shape intersects water_union) {
    cell_type <- "water";
}
Along riverbanks, many grid cells overlap with both the forest and the water geometry. Because forest is checked first, these cells are classified as forest and can burn, the river no longer acts as a firebreak. The fix is to check water first, so that any cell touching a water body is always classified as water regardless of what else it overlaps:
if (water_union != nil and shape intersects water_union) {
    cell_type <- "water";
} else if (forest_union != nil and shape intersects forest_union) {
    cell_type <- "forest";
}
Error B — Wrong coordinate reference system
Even with the classification fixed, the grid may appear misaligned or the forest and water areas may not correspond to their real-world locations. You have to options to check the CRS:
- Hover with the cursor over the shapefile path, a dialog is opening and the corresponding CRS is displayed (see fig. 5.3)
Figure 5.3: Showing the CRS of shapefile when hovering over the file path in GAMA
- Open the shapefiles in QGIS and check their CRS under Layer Properties → Information → Coordinate Reference System (CRS)
The Salzachauen area lies in UTM Zone 32N, the correct CRS is EPSG:25832. If your shapefiles are in EPSG:4326 (WGS84, degrees), GAMA will load the geometries in geographic coordinates rather than metric ones. The grid cell size will no longer correspond to real-world metres, and the spatial relationships between cells and geometries will be distorted.
To fix this, reproject both shapefiles in QGIS:
- Right-click the layer → Export → Save As
- Set CRS to the same as the other shapefile
- Save and replace the files in your
includes/folder
Fix with AI
For Error A, AI can fix the classification order directly and provide the
relevant init block and describe what you observed:
I am using GAMA 2025-06. In my wildfire model, fire crosses water bodies
instead of stopping at them. Here is the cell classification in my init block:

[paste init block]

The shapefiles are salzachauen_forest.shp and salzachauen_water.shp in
EPSG:25832. Water bodies should act as firebreaks, no FireCell classified
as water should ever burn. Please fix the classification logic.
For Error B, AI cannot fix a CRS issue that requires working directly in QGIS. However, AI can help you write the correct processing script to reproject your files or where you find the option to reproject it within QGIS if needed.
Level 4 — Logic errors
The model now loads and the spatial relationships are correct. Run the simulation and observe the fire spread carefully.
Set the wind origin to 90° (East) in the parameter panel. Does the fire spread predominantly eastward? Change to 270° (West). Does the spread direction change accordingly?
Hint
Pick a clear wind origin like 0° (North) or 90° (East) and watch where the fire front moves after 20 to 30 steps. If it moves in the opposite direction, look at how the wind bonus and penalty are assigned in the spread reflex specifically which angular condition receives which probability adjustment.
Error and fix
The wind bonus and penalty are swapped. In the spread reflex, the ignition probability is adjusted based on the angle between the spreading direction and the wind direction:
if (angle_diff <= wind_cone) {
    prob <- max(0.0, prob - wind_penalty * wind_speed); // ERROR: should increase
} else if (angle_diff >= (180 - wind_cone)) {
    prob <- prob + wind_bonus * wind_speed;             // ERROR: should decrease
}
A small angle_diff means the neighbour lies in the wind direction —
fire should spread faster there, so the probability should be
increased. A large angle_diff means the neighbour lies against the
wind — fire should spread slower, so the probability should be
decreased. Here the logic is reversed: the model penalises spread in
the wind direction and rewards spread against it.
The fix is to swap the two assignments:
if (angle_diff <= wind_cone) {
    prob <- prob + wind_bonus * wind_speed;             // with the wind: increase
} else if (angle_diff >= (180 - wind_cone)) {
    prob <- max(0.0, prob - wind_penalty * wind_speed); // against the wind: decrease
}
This error is a good example of why logic errors are the hardest to find: the model compiles, loads, and runs without any warning. The only way to catch it is to observe the output, form an expectation based on the physical process being modelled, and compare the two. No error message will ever point you here.
Fix with AI
Logic errors are where AI assistance is most valuable but only if you describe the observed behaviour precisely rather than just sharing the code:
I am using GAMA 2025-06. My wildfire model has a wind-driven spread
reflex but the fire spreads in the wrong direction. When I set
wind_direction to 90° (East), the fire spreads westward instead.

Here is my spread reflex: [paste reflex code]

The angle_diff variable represents the angular difference between the
spread direction and the wind direction. A small angle_diff means the
neighbour is in the wind direction. Please identify and fix the error
in the probability adjustment logic.
Describing the expected physical behaviour fire spreads with the wind, not against it gives the model the domain knowledge it needs to identify the swap without guessing.